Thursday, October 28, 2010

Birthday Cinnamon Rolls


When I asked my husband what his favorite breakfast food was besides waffles (he eats them frequently) he said cinnamon rolls from the can. I thought surely I could find a scratch recipe better than cinnamon rolls out of the can. So, looking through my cookbooks I found one in the Weekend Baker. Perfect! It told me what things I could do ahead so I could just stick them in the oven in the morning. Also, I was looking at Abby Dodge's blog and found a small tweak to the recipe that increased the cinnamon and flour. I had never made cinnamon rolls before, but after making brioche a few weeks ago I had a little more confidence in my bread making abilities. These were so easy to make.

First you make the dough. That was easy though it seemed to take longer for my dough to mix up and start pulling away from the bottom of the bowl. I couldn't turn up the mixer speed too much or it would start walking away. Then it had to rise for about 50 minutes.


In between working on the icing for the caramel apple cake I made the filling for the cinnamon rolls with the increased amounts of cinnamon and flour. Another simple step.


Next up, it was time to roll out the dough and spread the filling.


Then I rolled them up and sliced them. Some of mine ended up being a little bigger than they were supposed to be, but that wasn't a problem.


Then I set them in the baking dish. That was also easy enough. I let them rise while I finished the cake and then put them in the fridge overnight.


The next morning I got up early, started the oven, pulled them out of the fridge, and started the icing topping. I put them in the oven and continued getting ready for work. Not too long after that they were done, and we sat down to homemade cinnamon rolls for breakfast. My husband really enjoyed them. I think those might replace the canned variety as his new favorite!

Wednesday, October 27, 2010

Caramel Apple Birthday Cake


My husband's birthday was last Wednesday. Originally he said he wanted a cookies and cream cake, but then after having cookies and cream cupcakes the Friday before he was sick of that combo. Since I got to taste the Caramel Apple Cake at the Baked Explorations class I convinced him to let me make it for his birthday.

I didn't have any time to bake it the weekend before his birthday so the process started Monday night around 8:30. The cake batter is pretty simple, and it smells amazing before you even put it in the oven. It has all of the spices of a pumpkin pie so it's definitely a perfect fall pie. There's a note in the recipe telling you how to make your own applesauce for it, but I just bought some. Unfortunately I didn't realize when I went to the store that it called for 4 cups so I only bought one jar and then had to go back when I started getting the ingredients out.


The applesauce and flour mixture go in last. I used the tip I learned in the Baked class about using a scoop to evenly distribute the batter between the 3 pans. I definitely need a bigger scoop because that seemed to take a while, but they were pretty even.


The only real problem I ran into with baking the cake was I didn't let it sit in the pan long enough because it was late and I really wanted to get to sleep. That ended up being a bad decision because one of the layers started to split down the middle. Oh, well. I figured I would just fix that with icing later and deal with it. I wrapped up the layers Tuesday morning before work.


Tuesday evening was busy. I had decided to make homemade cinnamon rolls in addition to the cake (another post to come on those). First up was the caramel for the icing because it was supposed to be room temperature for the icing. I was determined to not burn the caramel this time. I watched the temperature closely and also went by look. I even remembered that the heavy cream needed to be warmed up prior to adding it to the hot sugar mixture. But, I think I added the cream too quickly or my pot was too short and ended up with caramel boiling over the top of the pan, making a huge mess. I probably should have either started over or at least cut back on the amount of butter I added, but I didn't. It looked okay, but it was definitely very buttery flavored caramel. (Tastes good on vanilla ice cream though!)


Late that night I started on the rest of the icing. It starts out with a roux. The recipe says to whisk it occasionally, but I think I should have whisked a little more because some of the sugar and flour got stuck on the bottom of the pan.


Once the roux is done it goes in a mixing bowl and is mixed until it cools to room temperature. I forgot to strain mine, but it only affected the texture a little bit. And, then more butter goes in. Again, I should have cut back on the butter after the problematic caramel, but I didn't.


After finishing the icing the consistency wasn't quite right so I stuck in the fridge while I finished getting the cinnamon rolls ready. Then I got the cake iced. Despite the problem with the one layer splitting it didn't really cause too much of a problem while icing.


I decided to try to do the same design as the picture in the book. I used a piping bag with a small hole cut at the tip to put circles around the cake and then ran a toothpick from the center to the outside to complete the look. I guess it's not really a birthday design, but it looks cool. My husband really only cares about how it tastes anyway. :)


This cake was so, so moist! The icing was definitely a little buttery so I will have to try making it again because I know it should taste even better. Everyone at the birthday party enjoyed it. The main comment was on the moistness.

Monday, October 18, 2010

Many-Splendored Quick Bread and Other Weekend Events


This weekend was filled with baking, cooking, and cake decorating events. First there was the Baked class on Friday which I already posted about. Then Saturday evening my husband and I went to an Alton Brown book signing. He did a question and answer for about 45 minutes and then signed books. Fortunately I had gotten a couple of tickets to the event earlier in the week because there was a huge line out the door for those who didn't. He was really nice and just as quirky as he seems in Good Eats.


Then Sunday afternoon I went to an intro class on gelatin flowers. It was a neat technique, but I don't know if it's something that I would do on my own for a cake. I think I prefer the look of gumpaste flowers. Plus, we used disco dust (aka non-toxic glitter) on these and I ended up with it all over me.


When I got home I was going to start dinner, but my husband wasn't hungry so I started the quick bread instead. That was the cake of the week for the HCB group though it isn't really a cake, but it was nice to have something quick to make. I started getting out all of the ingredients and then realized that I had thrown out the canola oil earlier in the week because it was expired so I did a quick trip to the store to get more. The only thing that really took much time was getting the ingredients together because I used the food processor to shred the carrot and zucchini.


Other than that the only part that took much time was toasted the walnuts and attempting to remove the skins. But, after the challenges of some of the other recipes that really wasn't a big deal. I baked it while cooking dinner, and I managed to convince myself to let it cool some before slicing it. The bread was very moist. I love the green and orange specks in it! It almost looks healthy.

Saturday, October 16, 2010

Baked Explorations


Last night I took a class at Central Market from Matt Lewis and Renato Poliafito. The class mostly showcased recipes from their newest book, Baked Explorations: Classic American Dessert Reinvented. I bought their first cookbook the week before the class but didn't have a chance to bake anything from it so all I knew going into the class was their brownies were supposed to be the best according to Oprah and others. It turned out to be a very fun class. Their personalities are great, and they have such wonderful stories to go along with each of the recipes.

The first recipe they covered was Chipotle Cheddar Biscuits. These are actually from their first cookbook. They looked very easy to make, and I thought the amount of spice was perfect. (I am a Texan though so keep that in mind if you're not used to the heat.)

Next up were the Marshmallow Chocolate Cups. They really stressed the importance of using a good chocolate and especially one with no oil. I had never made marshmallow before, but I think I will give these a try. I'm not a big fan of dark chocolate, but since it was combined with the milk chocolate I thought they turned out really well.

The Sweet & Salty Brownie tied for my favorite of the evening. And, I learned something about making caramel. They said when you stir the sugar, corn syrup, and water you don't want to splash the sides of the pan or you'll end up with crystals. The few times I've made caramel recently I've always ended up with crystals. The brownies are so delicious. The caramel seeps into the brownies when they're baked so you don't have a distinctive caramel layer, but you do have that flavor. This is definitely on my to-make list. One funny thing we learned was they disagree about which is better - corner or middle pieces. They don't ship corner pieces. I liked both but prefer middle. My husband couldn't believe they don't ship corner pieces. He said that's the best part.

Mom's Olive Oil Orange Bundt is great option if you want something a little lighter tasting. I really liked it with the optional glaze, but I like icing so that's no surprise.

The Caramel Apple Cake was my other favorite dessert and probably my favorite part of the class. A couple tips they mentioned for their cakes are spoon the flour into the measuring cups and then level, and when trying to get even amounts of batter in each pan use a large ice cream scoop with a release mechanism and alternate putting one scoop in each pan. So, when they started making the cake they asked if there were any cake decorators in the class. No one raised there hand at first so I tentatively raised mine because I don't do this for a living and am still learning. They asked if I would come up to decorate the cake, and I at first said no until they said they needed a volunteer from the class at which point I agreed. So, when the cake was ready to be iced I went up to the front of the class thinking for sure I was going to mess it up. The icing for this cake is one that uses flour, and it was very easy to work with. It went on very smooth. I just wish I had gotten someone to take a picture, but they did write "Thanks for decorating" in my book! This cake was very rich. I loved it. I talked my husband into letting me make this for his birthday this week so look for a post on it next week.

I have already marked recipes that I want to try out of both of their books. I'm tempted to try to do a little bake through challenge for their new book, but I'm not quite sure if I can do that and the Heavenly Cake Bakers group. Maybe once or twice a month would work.

Cookies and Cream Cupcakes


My husband's birthday is coming up next week, and he was going to have friends over Friday evening to celebrate early. So, to make it a little more of a party I offered to make cupcakes. He told me he wanted the blender cupcakes with cookies and cream icing. Because I've made those before and wanted to turn it up a notch I decided to try putting half of an Oreo cookie at the bottom of the cupcake. I had seen that done in other people's blogs so I thought it would work well.

I started off by placing half an Oreo including the cream at the bottom of each of the cupcakes. If I do these again I will probably use Double Stuff Oreos instead. Then I mixed up the Emergency Blender cupcake recipe from the Weekend Baker and poured that over each of the Oreos and stuck them in the oven. Then I mixed up the Oreo frosting which I found on Cake Central. I added a little extra powdered sugar which may have sent the sweetness level over the edge a bit. My husband normally only complains about things not being sweet enough so I guess I wanted to make sure that didn't happen this time. After the cupcakes cooled I started frosting them. Only problem was I didn't use the food processor to break up the cookies and I ended up with some small chunks of cookie which kept getting stuck in the piping tip. After getting mad at it a few times I managed to get them all iced.

I tried getting a nice picture of the inside of the cupcake, but it was dark and my camera doesn't do well with close-ups. It's either that or I don't take good close-up pictures. Either way, it's a little blurry, but you can see the Oreo at the bottom of the cupcake. This cupcake's icing to cake ratio was a little high, but that's how my husband likes them. Amazingly after eating 2.5 of these yesterday he decided that he's had enough Oreo and would like something different for his actual birthday cake next week! Yay! I really wanted to try a different recipe!


Sunday, October 10, 2010

Molten Chocolate Souffle and Lava Cakes

The first time I tried a chocolate souffle cake was on my honeymoon in Hawaii at Roy's. It was amazing. So, I had high hopes for this cake. I really wanted to be able to recreate something similar to that one:


But, I ran into a couple problems and just didn't have the time to fix them. I made the ganache Saturday night. I wanted to use a sweeter chocolate than what the recipe called for, but I was afraid it would effect the consistency of the ganache balls so I stuck with the bittersweet. I poured it into an egg carton lined with plastic wrap. I was tempted to use something else because this seemed to be a bit of a pain, but I decided I should follow the directions. I even weighed as I poured.


Then Sunday afternoon I was running a little late and only had an hour and 15 minutes to finish them before I was going to meet a friend to go bike riding, but I really wanted to get them done so we could taste them after dinner. I got all of the ingredients out and started making the batter. I went the quick route with melting the chocolate and just did that in the microwave. After reading others blogs I had decided to substitute semi-sweet chocolate for the bittersweet in the batter. Everything was going okay until I pulled the ganache out of the fridge and realized that it hadn't firmed up at all. I stuck it in the freezer for about 15 minutes, but that really wasn't enough time to fix it. But, with only 10 minutes left to get out the door I just went with it and put what I could on top of the batter. Most of it just stuck to the plastic wrap.


Then my husband stepped in and helped with pulling them out of the oven when they were done and putting them in the fridge so that I could still get in a bike ride. Given my issues with the ganache I would say they turned out okay, but there really wasn't much lava to them. I will definitely have to give these a second chance though. Next time I will make them sweeter and try Raymond's method of just scooping out the ganache with a melon baller instead of dealing with the stupid plastic wrap and emptying out a carton of eggs.


Apple-Cinnamon Crumb Coffee Cake


I had a bit of a rough week this week, and I kept thinking that I just wanted to bake something. I wanted it to be something relatively simple and not a multi-day baking project. I found the list of cakes that the HCB group has made and that Marie made prior to starting the group and thought it would be good to pick one of those. I also wanted it to choose something that Daniel would like. When I showed him the picture of the coffee cake he said that looked really good so I decided that's what I would make. I went to the store earlier in the week and bought a Granny Smith apple and walnuts, but then I never had time to make it during the week. By Saturday I was feeling better but still wanted to make the cake. So, after doing a bunch of stuff outside in the morning - running, planting flowers, and putting up Halloween decorations I finally got started on the cake in the afternoon.

You start out by making the crumb topping and then setting that aside in the fridge while you slice the apples and mix up the batter.


I didn't measure my apples when I sliced them. I realized when I started laying them on the cake that they should have been a bit thinner. After slicing you put a little lemon juice on them to keep them from turning brown.


The batter was very straight forward to mix up, and then you layer it in the pan - 2/3 batter, part of the crumb topping, apples, and remaining batter.


While it bakes part way you're supposed to form 1/4 inch balls of the crumb topping. You're supposed to do that for a third of the crumb topping, but that was a little too tedious for me. I might have done one fifth of the crumbs. The rest were smaller crumbs. I don't think that mattered that much though. It still tasted great and looked pretty good. The outside of the cake was a tiny bit dry, but the inside was super moist. My husband mostly approved, but I did find out afterwards that he doesn't really like cooked apples. Hopefully he'll approve of this weekend's HCB cake - it's all chocolate.


Monday, October 4, 2010

Caramelized Pineapple Pudding Cakes with Homemade Brioche


After surviving the Apple Caramel Charlotte a couple weeks ago I thought I would be fine with anything until I saw this recipe. I had never made bread pudding or yeast bread before. I bought the Bread Bible earlier this year, and I planned to make bread but had been too intimidated to give it a try. I thought about just buying the brioche, but I really felt like I should go all out on this challenge. I knew I needed to start the bread early, but last week was really busy so there wasn't any time during the week. Then around the end of the week I found out my cake classes that I was planning to take on Saturday had been cancelled so I hoped that would give me enough time to make the bread.

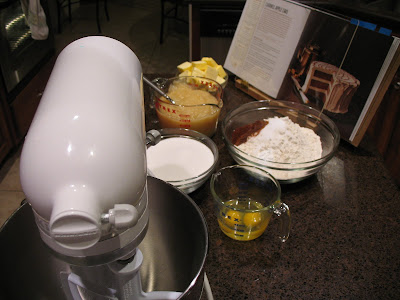
So, Saturday afternoon I got started. After reading Marie's post about wishing she had doubled the bread recipe I decided to double mine. The plan was for me to get to the point where there were only a couple steps left to do with the bread Sunday morning. Whisking the sponge and then mixing the rest of the ingredients together with the dough hook (it's first use in the seven years I've had the mixer):


I got the dough to the point where it was ready to sit out at room temperature and rise prior to going to dinner. One of my coworkers told me the trick to making bread around here was to make sure the room is warm enough for the bread to rise since most people have the A/C set pretty cold. She told me one trick was to put a warm pan of water below the dough but not touching it. Well, I don't think my dough had any problems rising:


Next step was to roll out the dough and fold the dough like a business letter. Then it went back in the fridge.


The next morning after getting my weekly grocery trip out of the way I rolled out the dough again and got it ready for the final rise in the pans. While it rose my husband and I took our dog to a nearby trail for a long walk. And, it once again rose more than expected in that short time. But, I hoped it wouldn't be a problem. I cut a slit across the top and brushed the loafs with an egg glaze and stuck them in the oven. The kitchen smelled so good while they were baking. They looked really good when I took them out, and I had to resist the temptation to cut into them too early.


After letting the bread sit for 2 hours it was finally time to start on the actual cake. Now it was 3:00 and I was starting to question whether I was actually going to finish this. I had originally planned for my mom to come over for dessert, but I just didn't think I would be done at a decent time. Of course, I went for the quickest option for drying the bread cubes - in the oven at 200 degrees for an hour.


After that it was time to make the creme anglaise which was very straight forward. Then the bread cubes are soaked in the cream.


The bread cubes had to soak for at least 2 hours so while they soaked I cooked and ate dinner and then got started on the first caramel. I actually managed to get my thermometer attached to the pan correctly and the color looked good to me. It stayed liquid until after I poured it in the custard cups, and then it was hard as a rock. I figured that it would be fine once the pudding cakes cooked, but as everyone else found out that didn't happen. It stayed stuck to the custard cups.


The next step was to roast the pineapple, but first I had to peel, slice, and core it. I had never done that before, and I almost bought some already peeled and cored at the grocery store but decided I could figure it out. That's what the internet is for. I found this great video.


The roasting syrup for the pineapple gave me problems. First it just wouldn't caramelize like it should have. I think it might have burnt a tiny bit, but I was so ready to be done that I continued on. I put the pineapple in and finally got it in the over. The directions said to baste every 5 minutes until it was tender and the juices thickened to a sauce. I sat down at the breakfast table next to the oven so I could watch my Sunday evening shows and baste the pineapple. I kept wondering about how long this should take because it seemed to be taking forever, and each time I opened the oven I was just hoping it would be done. Finally once it was done I took the pan out and instead of waiting for the pineapple to cool in the pan I moved it to the cutting board to cool quicker and slice.


I finally made it to the last step, and it was now after 10pm. I was just ready to go to bed. I had already told my mom she could come over Monday for dessert, but I need to finish this and wanted to try it before going to bed myself. I arranged the pineapple in each dish and put the bread cubes on top. The directions said to drain any cream not absorbed by the bread cubes, but there was nothing left for me to drain so I just skipped that step. The bread puddings have to cook in a roasting pan with a boiling water bath, and that ended up being a pain because my pan was huge and needed more water than my kettle could boil at once. Eventually I managed to get them in the oven.


After 40 minutes of cooking they were done, and it was finally time to unmold one of the puddings to taste. Fortunately I had already read that others were having problems with the caramel so I didn't try to force it to cooperate too hard. The first one I plated didn't look the great because I did put the ugly caramel on top, but then one of the ones I plated tonight looked really good (the first picture).


My mom came over tonight and really liked the bread pudding part but wasn't wild about the pineapple, but she isn't a pineapple person. I thought they were pretty good, but I'm not a huge fan of bread pudding. My husband didn't like them, but he really dislikes bread pudding or anything with wet bread. I probably won't make these again, but I will definitely make the bread again. This helped me get over my fear of working with yeast breads.